
DIY Friendly Inground Trampoline Installation
Our specialty designed frames and easy to follow manuals make DIYing your inground trampoline easier than ever.
Get started by watching the videos


7 Easy Step PDF Instructions


Digging The Hole
Find your trampoline size below to start.
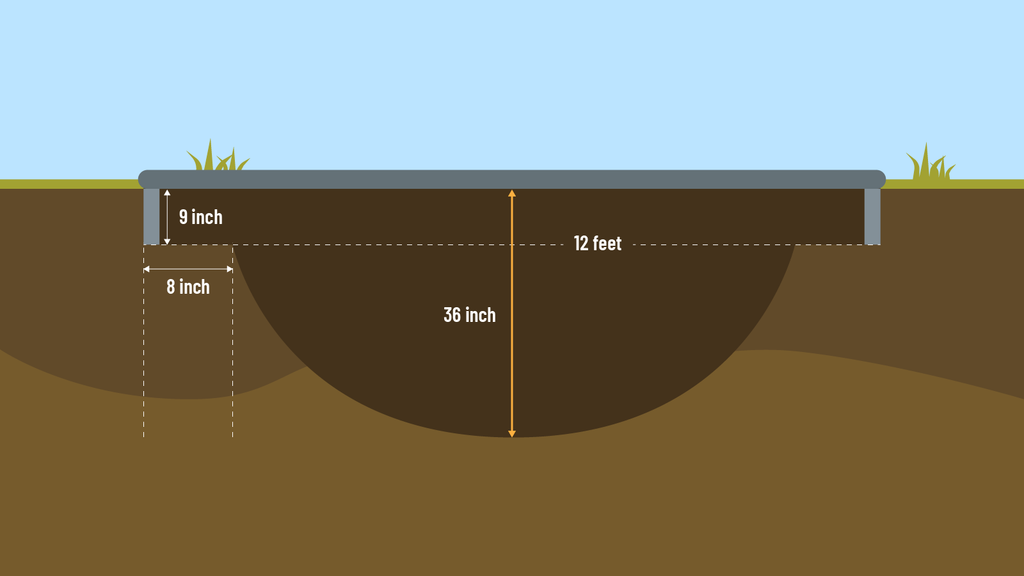
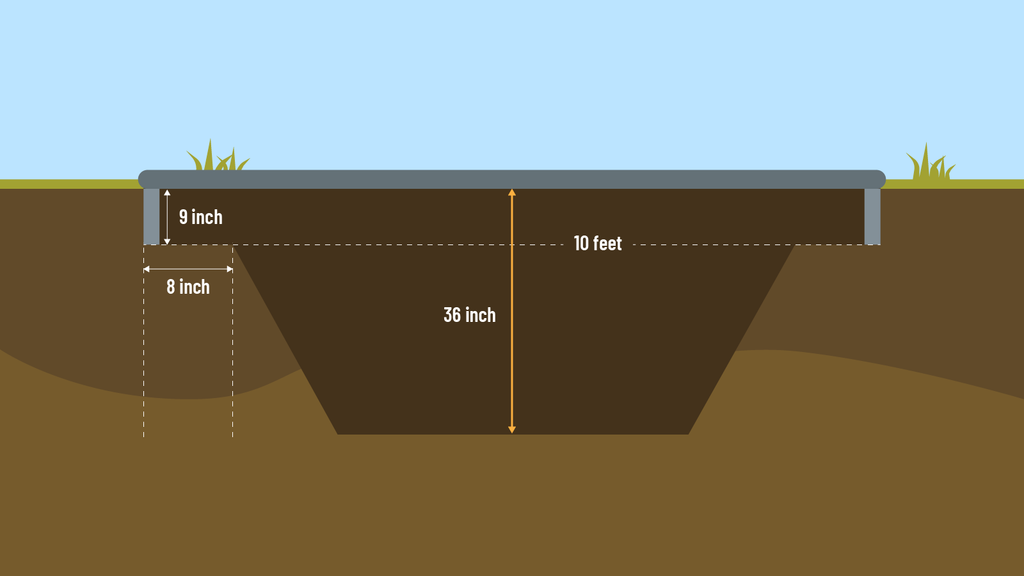
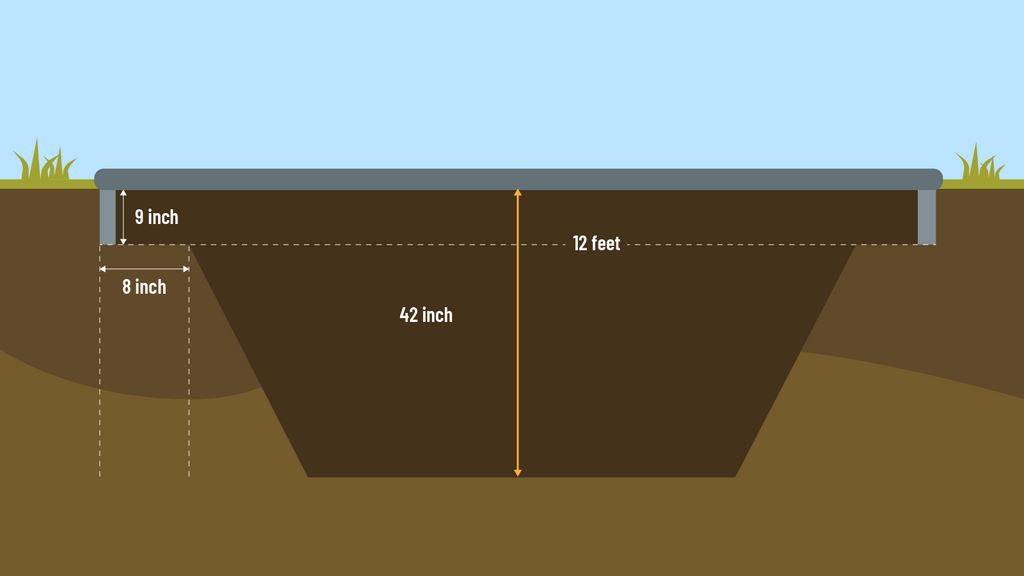
Consult your manual for the required depth and use a measuring device for accuracy. Dig to this depth for the entire hole, measuring all sides periodically.
Trampoline Shape & Size
Hole Depth
Diagram

Round '12
Hole Depth: 36 inches
36 inches

Round '14
Hole Depth: 36 inches
36 inches


Round 15’
Hole Depth: 36 inches
36 inches

Rectangular 10x14’
Hole Depth: 36 inches
36 inches

Rectangular 10x17’
Hole Depth: 36 inches
36 inches

Rectangular 12x18'
Hole Depth: 42 inches
42 inches
Do-It-Yourself Step By Step Guide
DIY is a great option and we are here to help!
Here’s a step-by-step playbook on how to install our inground trampolines:


Tools Required
- Shovel
- Gloves
- Rake
- Pick Axe
- LawnSpray Paint
- String
- Lawn Stakes
- Measuring Tape
- Level
Suggested Materials
- Weed barrier for hole
- Gravel for hole
Setup the Frame & Mark The Dig Area
Begin by assembling the frame in the area earmarked for digging. Ensure the springs' holes face upward during assembly. Two people can expedite the process.
Once the frame is set, mark the dig area, adding 2-5 inches to the frame outline for easierplacement. Use spray paint for marking. This extra space aids in backfilling.
With the frame assembled and the area marked, remove enough turfto serve as backfill, covering your tracks effectively.
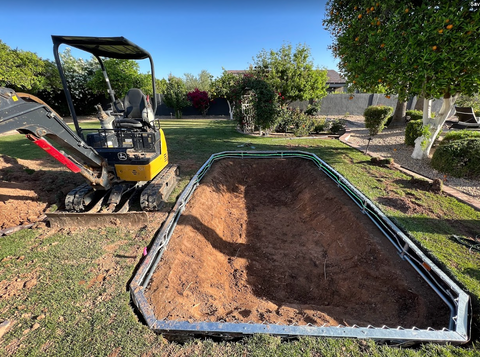
Digging the Hole
Start by saving enough turf for backfilling.Begin digging the first hole, reaching the shelf level. Consult your manual for the required depth and use a measuring device for accuracy. Dig to this depth for the entire hole, measuring all sides periodically.
After the first hole, mark the area for the next hole, considering shelf length requirements. Add an inch or two for backfilling. Dig the second hole, designated as the bounce area or bowl area.
The sides of the hole can have a steep angle to minimize soil removal. They don't have to go straight down.
Finish the Frame and Place it in the hole
After digging the hole, assemble the frame by attaching the retaining walls using a screwdriver.
Align the retaining walls with pre-existing holes and screw them in. Start with the top holes, then move to the bottom for a secure attachment.
Place the frame inside the hole on the shelf to ensure it fits correctly. Make adjustments if needed.
Confirm the frame fits, then lay down the membrane.Lower the frame into the hole, moving on to the next step.
Attach the Springs
After placing the frame in the hole, attach the mat with the springs. For a rectangle trampoline, start with the four corners and the middle of the sides, then proceed.
For even tension, work opposite sides with someone.
Once springs are attached, check for any movement in the frame. Perform a test jump to ensure everything is secure.
If everything feels good, backfill the space between the retaining wall and the ground. Avoid soil inside the bowl area.
Pack the backfilled soil tightly and re-turf using the saved turf when ready.
Attach the Pads
To complete assembly, focus on attaching all the pads. Start by getting all the toggles onto the pad, ensuring the round ball faces the inside.
Once attached, flip the pad onto the trampoline and loop the toggles onto the frame as per your manual instructions.
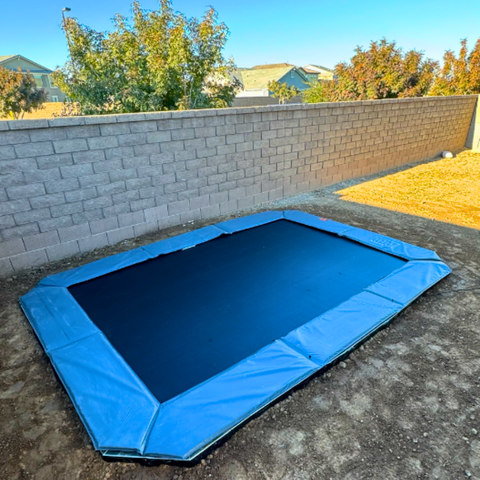
Have Fun!
Congratulations! You've finished the DIY assembly. Take it for a spin immediately to ensure everything feels good. Get ready for years of classic, enjoyable backyard fun!
Frequently Asked Questions
Can I put a regular trampoline in the ground?
Can you put an inground trampoline on artificial grass?
Can I put a trampoline in the front yard?
Can I install a trampoline on uneven ground?
Can I use a trampoline in the winter?
Not feeling the DIY? No Problem!
Click the link below to get a free quote from one of our professional landscape installers in our network. They will provide you with a quote and help you get your inground trampoline installed in no time!
Get a Free Quote